Create a Realistic Mosaic Tile Illustration in Procreate With 20 Brushes, 3 Patterns and 4 Palettes
Delores Naskrent
1:06:00
Description
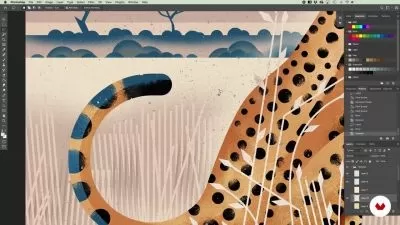
Have you ever wondered how to make digital mosaics? Would you like to learn how to create faux mosaics on the iPad with Procreate? Making your own in this class, Create a Realistic Mosaic Tile Illustration in Procreate, is a fun and attainable illustration technique that has become more and more desirable as a technique. Why? That’s easy: it’s because mosaics are really satisfying to make, and the end result is eye candy, to-be-sure! We work from start to finish, and you can use the sketches I have provided. Upon completion of the class, you will have a gorgeous, realistic, 3d mosaic.
This class is best for students who already have some experience with Procreate, but if you are new and looking for a challenge, you will learn so much. To make the whole process easier, I have included a brush set for students in this class. There are 20 brushes for tile patterns, lines of tiles, grout, and textures.
In this class I’ll walk you through:
- my step-by-step method for drawing out a suitable pattern
- tips for creating compositions using the tile brushes
- my workflow for use of layers to create shadows and highlights
- adding tons of texture and interest for variety
If you’re looking for a challenge and have a good basic knowledge of Procreate, you’ll be able to go through the whole process easily. You will be able to put your own spin on it with unique color choices, textures and use of my layouts or layouts you create yourself.
The key concepts I will include:
- considerations for working with tile shaped brushes
- how to use the brushes to achieve your desired result
- methods to approach new techniques
I think you will enjoy yet another fun project that teaches you so much while being fun and challenging at the same time. Learning new Procreate techniques is always relevant to future challenges. I am absolutely convinced, now that I have completed this project, that you will create something equally stunning, and it’s so enjoyable, once you get into the groove!
Intro to Intro Realistic Mosaic in Procreate
This short intro will give you an overview of the class.
Lesson 1: Examples, Inspiration and Brushes
In this lesson, I will give an overview of mosaic tile art. We look at general examples, historical examples and projects done using Procreate and techniques like those I will be showing you. You will also receive an overview of the brushes I have created and how they can be adjusted.
Lesson 2: Laying Down Initial Tiles
In this lesson, I will break down the complete process of choosing what brushes to use. I show you several of the brushes from the brush set and explain the idiosyncrasies of each. I will explain the settings and sizing of the brushes in relation to the look we are trying to achieve. I will show you some of the key techniques I use and explain every step of the way. By the end of the lesson, you will a good idea of what is in store for you in creating this mosaic.
Lesson 3: Experimental Options for Smaller Trim Tiles
In this lesson, we will experiment with adding the smaller dark tiles that run along the original tiles. I show two methods, so watch the whole lesson and decide which method you want to try.
Lesson 4: Adjusting and Finessing the Lines
In this lesson I go through and try to adjust all the lines and spacing. We encounter a few challenges that we deal with as each presents itself. We will employ the use of the liquify tool, the freehand selection and of course, the eraser and paint tools.
Lesson 5: Filling with a Background Tile
Adding the background tile around the lines we created initially is the focus of this lesson. I show you a few possibilities before I choose one, and I explain some of the idiosyncrasies of these large pattern brushes. There are different methods we can use to mask the areas, but I recommend the one that works best for me. I also model how to fix any troublesome areas.
Lesson 6: Adding the Highlights and Shadows
At this stage, we pull our layout together, and I will add the small details that make it work. I use the texture brushes to add realism to the tiles as we try to make them less than perfect. This also involves changing the colors slightly. The next big step is to add highlights and shadows and I guide you through the process. This is the last step before adding background details. This lesson involves playing with the layers a lot and I will show you some of the mistakes I made that you can avoid.
Lesson 7: Texture and Final Details for Realism
Adding all the finishing touches is the focus of this lesson. I will be adding all the background textures into the piece and then further enhance all the foreground items with a combination of textures such as spatters. Here we talk about blending modes and opacity as well. Finally, I will show you how to add a pair of shoes in birds-eye view to add scale. We will conclude almost everything in this lesson.
Lesson 8: Conclusion, Mockup and Next Steps
We will conclude everything in this lesson. I show you a couple of quick mock-ups with the final mosaics and we end with a chat about next steps.
Concepts covered:
Concepts covered include but are not limited to Procreate mosaic tile design, Procreate pattern brushes, layering, transparency, Procreate brush stamps, Procreate canvas settings, Procreate snapping and guides, the Procreate liquify tool, the eraser, Procreate brush creation, the Brush Studio in Procreate, adjusting Procreate brushes, sizing of documents and brushes, compositions with brushes, hand-painted details, adding texture with brushes, adding other interesting details, creating depth with highlight and shadow, workflow best practices, painting best practice, Procreate composites, techniques with paints and blending, and much more.
You will get the bonus of…
- 1 hour and 9 minutes of direction from an instructor who has been in graphic design business and education for over 40 years
- knowledge of multiple ways to solve each design challenge
- an outline with links to further research
- a list of helpful online sites to further your education into surface pattern design
What You'll Learn?
- Illustration
- Creative
- Digital Brushes
- Procreate Brushes
- Mosaic Art
- Procreate Illustration
- Illustrate On Procreate
More details
User Reviews
Rating

Delores Naskrent
Instructor's Courses
Hello, I'm Delores. I'm excited to be here, teaching what I love! I was an art educator for 30 years, teaching graphic design, fine art, theatrical design and video production. My education took place at college and university, in Manitoba, Canada, and has been honed through decades of graphic design experience and my work as a professional artist, which I have done for over 40 years (eeek!). In the last 15 years I have been involved in art licensing with contracts from Russ, Artwall, Studio El, Patton, Trends, Metaverse, Evergreen and more.
My work ranges through acrylic paint, ink, marker, collage, pastels, pencil crayon, watercolour, and digital illustration and provides many ready paths of self-expression. Once complete, I use this art for pattern design, greeting cards, wall art and many other pieces I sell through art licensing and on products I create for my store, shop.deloresartcanada.ca. I also sell Artist's Resources there and have some free products for you, so check it out and add your name to my mailing list!
The bottom line? I love to experiment and mix both natural and digital mediums to create everything from very commercial work to very non-commercial fine art abstract paintings (and yes, I do sell these, so I guess they are commercial after all). I am here to share that knowledge with all of you in the Skillshare universe, as this has been one of my favourite haunts! I feel privileged and excited to become an online teacher here amongst some real stars in the art world! Please join me in my classes and follow me. I am sure we will have tons of great adventures together (oh my, so cliché)! Anyhow, here we go...

SkillShare
View courses SkillShare- language english
- Training sessions 9
- duration 1:06:00
- English subtitles has
- Release Date 2024/02/24