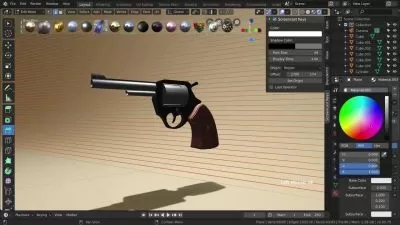
BLENDER: Learn how to create utility knife from A to Z
Mrawan Hussain
8:32:18
Description
In this course we will learn how to create Utility knife from start to finish using Blender 3.3
What You'll Learn?
- You will learn my modeling technique, how to create complex objects with correct shading smooth
- You will learn how to create nice details materials applied correctly on the object without any unwrapping
- You will learn how to create nice smooth lighting with camera depth of field to make your shot looks stunning
- Learn how to use the compositor to post-process the final result
- Learn how to edit the final render with photoshop to get a nice crisp image
Who is this for?
More details
DescriptionClass Overview:
Hello everyone, my name is Marwan Hussein, I'm a 3D artist, and I have been in this field for 10 years now, I would like to welcome you to my new Blender course, in this course we will learn how to create a Utility knife from start to finish using Blender 3.3
What You Will Learn:
in this course, we will focus on modeling, and we will learn how to create hard-surface modeling using simple easy techniques,
in the modeling section, we have a lot of tools make the modeling process faster and easier, we will focus on that to get a nice-looking 3D model without any shading issues.
after the modeling section, we will learn how to create simple nice realistic materials for the knife, I'm not going to unwrap the model but I will teach you how to create procedural textures and I will teach you how to apply these materials on the objects without unwrapping them.
after that we will learn how to create a nice simple scene to take the final shot for the knife, we will learn how to create soft lighting with a nice camera depth-of-field effect to make the final result looks more professional.
After that, we will learn how to use the compositor to post-process the final image and we will use Photoshop as well in case you want to use photoshop for post-processing.
Why You Should Take This Class:
If you are interested to create products with nice real presentations this course might be useful for you.
If you want to learn hard-surface modeling this course might be useful as well
If you are looking for short straight-to-point courses this course might work for you.
Who This Class is For:
This course is for anyone who wants to use Blender to create hard-surface modeling and get realistic render results.
If you are a beginner you should know the basics before you start, because it might be a bit difficult to you to follow me.
Materials/Resources:
I will leave the resources inside a section I will call ( Resources )
Who this course is for:
- This course for anyone wants to create nice simple realistic hard surface model.
Class Overview:
Hello everyone, my name is Marwan Hussein, I'm a 3D artist, and I have been in this field for 10 years now, I would like to welcome you to my new Blender course, in this course we will learn how to create a Utility knife from start to finish using Blender 3.3
What You Will Learn:
in this course, we will focus on modeling, and we will learn how to create hard-surface modeling using simple easy techniques,
in the modeling section, we have a lot of tools make the modeling process faster and easier, we will focus on that to get a nice-looking 3D model without any shading issues.
after the modeling section, we will learn how to create simple nice realistic materials for the knife, I'm not going to unwrap the model but I will teach you how to create procedural textures and I will teach you how to apply these materials on the objects without unwrapping them.
after that we will learn how to create a nice simple scene to take the final shot for the knife, we will learn how to create soft lighting with a nice camera depth-of-field effect to make the final result looks more professional.
After that, we will learn how to use the compositor to post-process the final image and we will use Photoshop as well in case you want to use photoshop for post-processing.
Why You Should Take This Class:
If you are interested to create products with nice real presentations this course might be useful for you.
If you want to learn hard-surface modeling this course might be useful as well
If you are looking for short straight-to-point courses this course might work for you.
Who This Class is For:
This course is for anyone who wants to use Blender to create hard-surface modeling and get realistic render results.
If you are a beginner you should know the basics before you start, because it might be a bit difficult to you to follow me.
Materials/Resources:
I will leave the resources inside a section I will call ( Resources )
Who this course is for:
- This course for anyone wants to create nice simple realistic hard surface model.
User Reviews
Rating

Mrawan Hussain
Instructor's Courses
Udemy
View courses Udemy- language english
- Training sessions 34
- duration 8:32:18
- Release Date 2023/02/25