Companies Home Search Profile

Arduino Step by Step Getting Serious

Focused View

Dr. Peter Dalmaris

33:51:46

9 View
  • 1 - What is this course about.mp4
    02:51
  • 2 - Is this course right for you.mp4
    02:35
  • 3 - Finding your way around the course.mp4
    15:24
  • 3 - List of links to sketches and other online resources for all lectures.txt
  • 3 - Repository of sketches schematics and links.txt
  • 4 - List of parts.mp4
    00:41
  • 4 - List of tools and parts.txt
  • 5 - Two common questions about parts and tools.mp4
    02:33
  • 6 - How to ask a question.mp4
    09:38
  • 7 - Error report form.txt
  • 7 - How to report an error.mp4
    01:34
  • 8 - 0490a Introduction to the BME280.mp4
    05:08
  • 9 - 0490b BME280 SPI wiring.mp4
    07:22
  • 10 - 0490c BME280 I2C wiring.mp4
    03:49
  • 11 - 0490d BME280 Sketch walkthrough and demo.mp4
    06:43
  • 12 - 0540a Introduction to the MPU6050 motion sensor.mp4
    04:56
  • 13 - 0540b A look at the MPU6050 datasheet.mp4
    04:37
  • 14 - 0540c MPU6050 wiring.mp4
    06:48
  • 15 - 0540d MPU6050 Arduino sketch.mp4
    14:08
  • 16 - 0540e MPU6050 Processing demonstration.mp4
    12:24
  • 17 - 0540f MPU6050 bonus lecture.mp4
    04:51
  • 18 - 0590a Introduction to the HMC5883 compass magnetometer.mp4
    03:00
  • 19 - 0590b HMC5883 wiring.mp4
    02:19
  • 20 - 0590c HMC5883 sketch.mp4
    07:09
  • 21 - 0590d HMC5883 demonstration.mp4
    04:58
  • 22 - 0620a Introduction to the flex sensor.mp4
    04:23
  • 23 - 0620b Flex sensor wiring.mp4
    05:46
  • 24 - 0620c Flex sensor sketch.mp4
    04:23
  • 25 - 0630a Introduction to the membrane potentiometer.mp4
    05:07
  • 26 - 0630b Membrane potentiometer demonstration.mp4
    04:22
  • 27 - 0640a Introduction to the rotary encoder.mp4
    07:58
  • 28 - 0640b Rotary encoder wiring and quadrature encoding.mp4
    10:05
  • 29 - 0640c Rotary encoder sketch.mp4
    10:17
  • 30 - 0670a Introduction to the keypad.mp4
    03:37
  • 31 - 0670b Working out the keypad pins.mp4
    11:41
  • 32 - 0670c Keypad wiring.mp4
    13:44
  • 33 - 0670d The phone keypad.mp4
    07:06
  • 34 - 0680a Keypad 1wire connection Introduction.mp4
    09:49
  • 35 - 0680b Keypad 1wire connection wiring.mp4
    08:54
  • 36 - 0680c Keypad 1wire connection sketch.mp4
    09:53
  • 37 - 0690a Keypad with the 74922 decoder IC Introduction.mp4
    08:48
  • 38 - 690b Keypad with the 74922 decoder IC wiring.mp4
    04:01
  • 39 - 690c Keypad with the 74922 decoder IC sketch and demo.mp4
    08:42
  • 40 - 690d Bitwise operators.mp4
    09:56
  • 41 - 0730a Introduction.mp4
    06:41
  • 42 - 0730b Setup graphics primitives and documentation.mp4
    08:00
  • 43 - 0730c Displaying images from the SD card.mp4
    04:54
  • 44 - 0730d Using the joystick and integrated button.mp4
    03:14
  • 45 - 0730e How to create your own user interface make the background image.mp4
    07:01
  • 46 - 0730f How to create your own user interface an example sketch.mp4
    14:10
  • 47 - 0732a Introduction.mp4
    06:11
  • 48 - 0732b Wiring.mp4
    03:22
  • 49 - 0732c Simple demonstrations.mp4
    08:31
  • 50 - 0732d Displaying data.mp4
    11:16
  • 51 - 0732e The library and resources.mp4
    02:12
  • 52 - 0735a Introduction.mp4
    06:26
  • 53 - 0735b Setup the IDE.mp4
    03:14
  • 54 - 0735c Graphics functions and documentation.mp4
    07:22
  • 55 - 0735d Test the touch interface.mp4
    03:57
  • 56 - 0735e Test the SD card module.mp4
    04:37
  • 57 - 0735f Create a custom user interface image.mp4
    07:23
  • 58 - 0735g Create a custom user interface sketch.mp4
    12:11
  • 59 - 0740a Introduction.mp4
    03:32
  • 60 - 0740b Wiring.mp4
    02:46
  • 60 - 0740128x64oledspish1106.zip
  • 61 - 0740c Libraries and support.mp4
    03:32
  • 62 - 0740d Finding the right constructor for your screen.mp4
    07:53
  • 63 - 0740e Demo sketch.mp4
    05:26
  • 64 - 0760a Introduction.mp4
    04:16
  • 65 - 0760b Single display wiring.mp4
    02:11
  • 65 - 07608x8ledmatrixdisplay.zip
  • 66 - 0760c Single display sketch.mp4
    06:29
  • 67 - 0760d Single display drawing.mp4
    09:23
  • 68 - 0760e Custom graphics.mp4
    06:25
  • 69 - 0760f Animation.mp4
    04:48
  • 70 - 0770a Four 8x8 LED matrix display introduction.mp4
    07:59
  • 70 - 07608x8ledmatrixdisplay.zip
  • 71 - 0770b Four 8x8 LED matrix display graphics primitives.mp4
    07:23
  • 72 - 0750a Introduction.mp4
    04:17
  • 73 - 0750b Single display pin role discovery.mp4
    07:03
  • 74 - 0750c Single display wiring.mp4
    04:33
  • 74 - 0750onesevensegmentdisplaywithoutlibrary.zip
  • 75 - 0750d Single display sketch.mp4
    06:54
  • 76 - 0750e Single display working out the digit byte array.mp4
    08:29
  • 77 - 0752a Single display with a single resistor.mp4
    05:23
  • 77 - 0752onesevensegmentdisplaywithsevseglibrary.zip
  • 78 - 0752b The sevseg library.mp4
    10:33
  • 79 - 0753a Dual seven segment display pin discovery.mp4
    09:20
  • 80 - 0753b Dual seven segment display wiring.mp4
    05:45
  • 80 - 0753dualsevensegmentdisplaywithsevseglibrary.zip
  • 81 - 0753c Dual seven segment display sketch.mp4
    08:54
  • 82 - 0754a Single seven segment display with shift register Introduction.mp4
    07:48
  • 82 - 0754one7segdislplaywithshiftregister.zip
  • 83 - 0754b Single seven segment display with shift register wiring.mp4
    03:20
  • 84 - 0754c Single seven segment display with shift register sketch.mp4
    08:00
  • 85 - 0755a Seven segment clock display Introduction.mp4
    03:25
  • 86 - 0755b Seven segment clock display pin discovery.mp4
    10:40
  • 87 - 0755c Seven segment clock display wiring.mp4
    08:47
  • 87 - 0755sevensegmentclockdisplay.zip
  • 88 - 0755d Seven segment clock display sketch.mp4
    09:10
  • 89 - 0755e Seven segment clock display Demo and wiring correction.mp4
    04:59
  • 90 - 0757a Seven segment clock display & I2C backpack Introduction and wiring.mp4
    03:28
  • 91 - 0757b Seven segment clock display & I2C backpack sketch.mp4
    11:42
  • 92 - 0757c Seven segment clock display & I2C backpack demo and wiring correction.mp4
    02:21
  • 92 - 0757sevensegmentclockdisplaywithi2cbackpack.zip
  • 93 - 0810a White 12V LED strip with the TIP122 transistor Introduction.mp4
    02:03
  • 94 - 810b White 12V LED strip with the TIP122 transistor TIP122 datasheet.mp4
    03:53
  • 95 - 810c White 12V LED strip with the TIP122 transistor circuit.mp4
    02:51
  • 95 - 081012vledstripwithtip122.zip
  • 96 - 810d White 12V LED strip with the TIP122 transistor wiring test.mp4
    11:51
  • 97 - 0810e White 12V LED strip with the TIP122 transistor blinking.mp4
    02:50
  • 98 - 0810f White 12V LED strip with the TIP122 transistor fading.mp4
    05:06
  • 99 - 820a RGB LED strip with the TIP122 introduction.mp4
    02:03
  • 100 - 0820b RGB LED strip with the TIP122 testing.mp4
    05:15
  • 101 - 0820c RGB LED strip with the TIP122 circuit and wiring.mp4
    03:44
  • 101 - 082012vrgbledstripwithtip122.zip
  • 102 - 0820d RGB LED strip with the TIP122 sketch.mp4
    03:30
  • 103 - 0830a Adafruit Neopixel 5x8 shield Introduction.mp4
    08:09
  • 104 - 0830b Adafruit Neopixel 5x8 shield Quick setup and demo.mp4
    02:47
  • 105 - 0830c Adafruit Neopixel 5x8 shield Sketch control single pixels.mp4
    12:34
  • 106 - 0830d Adafruit Neopixel 5x8 shield Sketch draw graphic primitives.mp4
    04:58
  • 107 - 0840a Adafruit Neopixel strip 8 LED Introduction.mp4
    04:08
  • 108 - 0840b Adafruit Neopixel strip 8 LED Sketch introduction.mp4
    01:26
  • 109 - 0840adafruitneopixelhighdensity8led.zip
  • 109 - 0840c Adafruit Neopixel strip 8 LED Circuit and assembly.mp4
    05:08
  • 110 - 0840d Adafruit Neopixel strip 8 LED Sketch walkthrough.mp4
    08:41
  • 111 - 0850a Adafruit Neopixel RGBW 30 LED strip introduction.mp4
    03:03
  • 112 - 0850adafruitneopixelrgbw30ledstrip.zip
  • 112 - 0850b Adafruit Neopixel RGBW 30 LED strip Wiring.mp4
    09:59
  • 113 - 0850c Adafruit Neopixel RGBW 30 LED strip Programming and demo.mp4
    03:27
  • 114 - 0850d Adafruit Neopixel RGBW 30 LED strip Sketch walkthrough.mp4
    10:43
  • 115 - 0899 Introduction to motors.mp4
    13:53
  • 116 - 0900a DC motors principles of operation.mp4
    11:37
  • 117 - 0900b Motor control with the L298N wiring.mp4
    09:21
  • 118 - 0900c Motor control with the L298N sketch and demo.mp4
    11:12
  • 119 - 0903a Motor control with the L8871 introduction.mp4
    05:38
  • 120 - 0903b Motor control with the L8871 Wiring.mp4
    02:57
  • 121 - 0903c Motor control with the L8871 sketch and demo.mp4
    04:19
  • 122 - 0910a Motor control with the Adafruit Motor Shield v2 introduction.mp4
    07:11
  • 123 - 0910b Motor control with the Adafruit Motor Shield v2 Wiring.mp4
    02:24
  • 124 - 0910c Motor control with the Adafruit Motor Shield v2 Sketch and demo.mp4
    08:50
  • 125 - 0930a Introduction to servo motors.mp4
    08:20
  • 126 - 0932a Direct control of a servo motor wiring.mp4
    02:11
  • 127 - 0932b Direct control of a servo motor sketch and demo with one motor.mp4
    04:54
  • 128 - 0932c Direct control of a servo motor sketch and demo with two motors.mp4
    05:11
  • 129 - 0933 Define servo motor moves in an array.mp4
    02:30
  • 130 - 0940 Continuous rotation servo motor.mp4
    06:43
  • 131 - 0945a The Adafruit Servo Shield introduction.mp4
    03:36
  • 132 - 0945b The Adafruit Servo Shield wiring.mp4
    01:45
  • 133 - 0945c The Adafruit Servo Shield Sketch.mp4
    14:42
  • 134 - 0945d The Adafruit Servo Shield Control an LED.mp4
    12:16
  • 135 - 0950a Introduction to stepper motors.mp4
    13:02
  • 136 - 0950b Dissecting a bipolar stepper motors.mp4
    04:47
  • 137 - 0950c How to determine the coil wires of a bipolar stepper motor.mp4
    03:58
  • 138 - 0952a NEMA17 with the L293 controller & Stepper library introduction & wiring.mp4
    07:46
  • 139 - 0952b NEMA17 with the L293 controller & Stepper library sketch & demo.mp4
    05:12
  • 140 - 0970a NEMA17 with the Easy Driver controller introduction.mp4
    06:50
  • 141 - 0970b NEMA17 with the Easy Driver controller wiring.mp4
    03:51
  • 142 - 0970c NEMA17 with the Easy Driver controller sketch.mp4
    09:46
  • 143 - 0972a NEMA17 with the Easy Driver controller & AccelStepper intro &sketch.mp4
    07:39
  • 144 - 0972b NEMA17 with the Easy Driver controller & AccelStepper demo.mp4
    07:19
  • 145 - 0975a NEMA17 with the Adafruit Motor Shield v2 & AccelStepper intro & sketch.mp4
    09:27
  • 146 - 0975b NEMA17 with the Adafruit Motor Shield v2 and AccelStepper Demo.mp4
    09:58
  • 147 - 0980a Unipolar stepper motor with Adafruit Motor Shield introduction.mp4
    03:10
  • 148 - 0980bUnipolar stepper motor with Adafruit Motor Shield determining coil wires.mp4
    07:10
  • 149 - 0980c Unipolar stepper motor with Adafruit Motor Shield demo.mp4
    10:30
  • 150 - 0982a Unipolar stepper motor with the ULN2003 driver introduction.mp4
    02:12
  • 151 - 0982b Unipolar stepper motor with the ULN2003 driver wiring.mp4
    02:03
  • 152 - 0982c Unipolar stepper motor with the ULN2003 driver sketch & demo.mp4
    07:37
  • 153 - 1100a Introduction to Ethernet networking.mp4
    07:58
  • 154 - 1100b The Ethernet shield.mp4
    10:37
  • 155 - 1101a Simple chat server introduction and wiring.mp4
    03:59
  • 156 - 1101b Simple chat server demonstration.mp4
    09:06
  • 157 - 1101c Simple chat server sketch.mp4
    13:43
  • 158 - 1102a Simple chat server with LCD shield wiring and demo.mp4
    04:36
  • 159 - 1102b Simple chat server with LCD shield sketch.mp4
    06:59
  • 160 - 1110a Simple reporting web server introduction and wiring.mp4
    03:40
  • 161 - 1110b Simple reporting web server sketch walkthrough part 1.mp4
    07:44
  • 162 - 1110c Simple reporting web server HTTP request formatting.mp4
    03:23
  • 163 - 1110d Simple reporting web server sketch walkthrough part 2.mp4
    08:16
  • 164 - 1111 Simple reporting web server outputting CSV formatted data.mp4
    03:50
  • 165 - 1120a Simple controlling web server with one LED wiring and demo.mp4
    12:15
  • 166 - 1120b Simple controlling web server with one LED sketch.mp4
    13:37
  • 167 - 1121 Simple controlling web server with two LEDs.mp4
    11:29
  • 168 - 1210a Introduction to the ATWIN1500 Wifi module.mp4
    10:37
  • 169 - 1210b Wiring the Adafruit ATWIN1500 breakout.mp4
    07:41
  • 170 - 1210c1 Adafruit ATWIN1500 Wifi breakout simple demo.mp4
    04:56
  • 171 - 1210c2 Adafruit ATWIN1500 Wifi breakout sketch walkthrough.mp4
    10:59
  • 172 - 1210c3 Adafruit ATWIN1500 Wifi breakout firmware version check.mp4
    01:51
  • 173 - 1210d1 ATWIN1500 Wifi breakout firmware upgrade.mp4
    13:10
  • 174 - 1210d2 ATWIN1500 Wifi breakout SSL certificate update.mp4
    03:03
  • 175 - 1210e1 ATWIN1500 Simple reporting server wiring.mp4
    03:47
  • 176 - 1210e2 ATWIN1500 Simple reporting server sketch.mp4
    07:49
  • 177 - 1210e3 ATWIN1500 Simple reporting server demonstration.mp4
    03:37
  • 178 - 1211a ATWIN1500 controlling LEDs with a CSV file on Amazon S3 intro.mp4
    02:37
  • 179 - 1211b ATWIN1500 controlling LEDs with a CSV file on Amazon S3 Setup S2.mp4
    07:48
  • 180 - 1211c ATWIN1500 controlling LEDs with a CSV file on Amazon S3 Demonstration.mp4
    04:02
  • 181 - 1211d ATWIN1500 controlling LEDs with a CSV file on Amazon S3 sketch.mp4
    13:15
  • 182 - 1212a ATWIN1500 controlling LEDs with a simple web server introduction & demo.mp4
    04:26
  • 183 - 1212b ATWIN1500 controlling LEDs with a simple web server sketch.mp4
    08:59
  • 184 - 1820 Introduction to Shift Registers.mp4
    07:17
  • 185 - 1821a Driving 8 LEDs with one 595 Shift Register intro and IC pin roles.mp4
    07:12
  • 186 - 1821b Driving 8 LEDs with one 595 Shift Register Assembly.mp4
    10:57
  • 186 - 1821595shiftregisterwith8leds.zip
  • 187 - 1821c Driving 8 LEDs with one 595 Shift Register Sketch.mp4
    05:00
  • 188 - 1823a Driving 16 LEDs with two 595 Shift Registers introduction.mp4
    04:05
  • 189 - 1823b Driving 16 LEDs with two 595 Shift Registers wiring.mp4
    01:55
  • 189 - 1823595shiftregisterwith16leds.zip
  • 190 - 1823c Driving 16 LEDs with two 595 Shift Registers sketch.mp4
    07:21
  • 191 - 1218a1 Introduction to the HC06.mp4
    01:45
  • 192 - 1218a2 HC06 Wiring.mp4
    03:39
  • 192 - 1218abbluetoothwiththehc06.zip
  • 193 - 1218a3 HC06 Pairing.mp4
    07:05
  • 194 - 1218b HC06 Reading sensor data.mp4
    06:35
  • 194 - 1218cbluetoothwiththehc06.zip
  • 195 - 1218c1 HC06 with SoftwareSerial.mp4
    08:23
  • 196 - 1230a Introduction to BLE.mp4
    06:45
  • 197 - 1230b A few things about the BLE standard.mp4
    03:37
  • 198 - 1230c nRF8001 setup.mp4
    04:07
  • 198 - 1230nrf8001.zip
  • 199 - 1230d nRF8001 callBack Echo demo.mp4
    02:51
  • 200 - 1230e nRF8001 simple duplex communications demo.mp4
    04:29
  • 201 - 1240a Introduction.mp4
    05:34
  • 202 - 1240b Pinouts.mp4
    10:46
  • 203 - 1240blueruitble.zip
  • 203 - 1240c Wiring and Demo.mp4
    11:20
  • 204 - 1240d Firmware update.mp4
    04:20
  • 205 - 1240e AT Commands.mp4
    14:06
  • 206 - 1240f1 Serial data link demo.mp4
    06:19
  • 207 - 1240f2 Controlling data link demo.mp4
    06:19
  • 208 - 1240g1 HID Keyboard sketch.mp4
    04:18
  • 209 - 1240g2 HID Keyboard demo.mp4
    03:39
  • 210 - 1240h2 Controller demo.mp4
    12:04
  • 211 - 1300a Introduction to the nRF24.mp4
    02:49
  • 212 - 1300b Module pinout.mp4
    07:35
  • 212 - 1300nrf24pinout.zip
  • 213 - 1300c Simple test wiring.mp4
    05:13
  • 213 - 1300nrf24.zip
  • 214 - 1300d Simple test sketch.mp4
    15:40
  • 215 - 1300e Simple test demo.mp4
    03:02
  • 216 - 1300anrf24node1.zip
  • 216 - 1300bnrf24node2.zip
  • 216 - 1300f Comprehensive demo.mp4
    06:36
  • 217 - 1300g Comprehensive demo sketch.mp4
    10:37
  • 218 - 1310a Introduction.mp4
    03:08
  • 219 - 1310arf422receiver.zip
  • 219 - 1310brf422transmitter.zip
  • 219 - 1310b Receiver and transmitter pins and wiring.mp4
    03:22
  • 220 - 1310c Receiver and transmitter sketches.mp4
    07:33
  • 221 - 1310d Demo.mp4
    03:33
  • 222 - 0010 Please watch this before continuing.mp4
    00:59
  • 223 - 1410asdcardmodule.zip
  • 223 - 1410a Reading and writing to an SD card Part 1 of 3.mp4
    13:41
  • 224 - 1410bsdcardmodule.zip
  • 224 - 1410b Reading and writing to an SD card Part 2 of 3.mp4
    10:16
  • 225 - 1410c Reading and writing to an SD card Part 3 of 3.mp4
    09:09
  • 226 - 1420a EEPROM internal and external Part 1 Basic use.mp4
    10:43
  • 227 - 1420b EEPROM internal and external Part 2 the EEPROMex library.mp4
    05:22
  • 228 - 1430externali2ceeprom.zip
  • 228 - 1430 EEPROM internal and external Part 3 Using an external EEPROM.mp4
    09:44
  • 229 - 2100a Hardware interrupts Part 1 Introduction.mp4
    12:02
  • 230 - 2100ahardwareinterrupts.zip
  • 230 - 2100b Hardware interrupts Part 2 Using volatile variables.mp4
    05:02
  • 231 - 2100btimerinterrupts.zip
  • 231 - 2100c Hardware interrupts Part 3 Timers.mp4
    04:53
  • 232 - 2100d Hardware interrupts Part 4 Highdefinition Pulse Width Modulation.mp4
    05:59
  • 233 - 2120 Memory management Part 1 Introduction and Flash.mp4
    05:34
  • 234 - 2130 Memory Management Part 2 Static RAM.mp4
    07:26
  • 235 - 2140 Power management with sleep mode and prescaling.mp4
    23:12
  • 236 - 2110aexternalpullup.zip
  • 236 - 2110binternalpullup.zip
  • 236 - 2110 Using the buildin pullup resistors.mp4
    07:01
  • 237 - 1810ademo1hardwaredebouncing.zip
  • 237 - 1810a Hardware switchbutton debouncing Part 1 Background.mp4
    07:05
  • 237 - 1810bdemo1hardwaredebouncingwithcapacitor.zip
  • 238 - 1810b Hardware switchbutton debouncing Part 2 Demo.mp4
    07:28
  • 239 - 1850aportexpandermcp23017demo1bb.zip
  • 239 - 1850a Control more devices with a port expander Part 1 Background and setup.mp4
    14:10
  • 239 - 1850bportexpandermcp23017demo2bb.zip
  • 239 - 1850cportexpandermcp23017demo3bb.zip
  • 240 - 1850b Control more devices with a port expander Part 2 more examples.mp4
    08:58
  • 241 - 1520a Real time clock Part 1 of 2.mp4
    15:42
  • 242 - 1520arealtimecountersimpledemo.zip
  • 242 - 1520b Real time clock Part 2 of 2.mp4
    07:29
  • 243 - 1700 Using the TIP22 transistor to control an LED strip.mp4
    07:28
  • 244 - 1720a Relays Part 1 Introduction.mp4
    04:37
  • 245 - 1720b Relays Part 2 How NOT to control a relay.mp4
    14:58
  • 246 - 1720c Relays Part 3 Connect a 12V relay component calculations.mp4
    09:45
  • 247 - 1720d Relays Part 4 Connect a 12V relay connections.mp4
    07:27
  • 248 - 1720e Relays Part 5 Relay shields.mp4
    04:02
  • 249 - 1500a Introduction to GPS.mp4
    08:19
  • 250 - 1500b Wiring the Adafruit module for direct communication with computer.mp4
    05:33
  • 251 - 1500c Getting and using raw text data from the module.mp4
    05:25
  • 252 - 1500d Using the Adafruit GPS library.mp4
    15:48
  • 253 - 1500e Using the TinyGPS library.mp4
    07:38
  • 254 - 1900 Intro and power circuit.mp4
    08:31
  • 254 - 1910abreadboardarduinopowersupply.zip
  • 255 - 1910bbreadboardarduinoaddatmegareset.zip
  • 255 - 1910cbreadboardarduinoaddoscillatorbb.zip
  • 255 - 1910 Atmega reset and clock.mp4
    11:13
  • 256 - 1910dbreadboardarduinoaddedpowerled.zip
  • 256 - 1910ebreadboardarduinoaddeddigpin13led.zip
  • 256 - 1920 Power LED and testing.mp4
    08:25
  • 257 - 1925a Create your own printed circuit boards PCB Part 1.mp4
    18:07
  • 258 - 1925b Create your own printed circuit boards PCB Part 2.mp4
    19:57
  • 259 - 2600a Using Processing the language with the Arduino Part 1.mp4
    14:42
  • 260 - 2600b Using Processing the language with the Arduino Part 2.mp4
    11:50
  • 261 - 2500a Create your own Library Part 1.mp4
    16:51
  • 262 - 2500b Create your own Library Part 2.mp4
    27:04
  • 263 - 1610a Introduction to the fingerprint scanner.mp4
    05:28
  • 264 - 1610b Wiring registering and recognizing fingerprints.mp4
    10:15
  • 264 - 1610fingerprintsensor.zip
  • 265 - 1610c Sketch and demonstration with an electric lock.mp4
    07:25
  • 265 - 1620fingerprintsensordoorlock.zip
  • 266 - 2340a Introduction to Helium.mp4
    05:47
  • 267 - 2340b Helium hardware.mp4
    07:57
  • 268 - 2340c Helium network explainer setup.mp4
    06:59
  • 269 - 2344a Helium Dashboard setup.mp4
    11:05
  • 270 - 2344b Helium Hello World setup.mp4
    07:09
  • 271 - 2344c Helium Hello World Sketch.mp4
    10:10
  • 272 - 2344d Helium random data.mp4
    07:37
  • 273 - 2345a Helium real sensor data setup.mp4
    03:51
  • 274 - 2345b Helium real sensor data sketch.mp4
    07:35
  • 275 - 2345c Helium real sensor data demo.mp4
    02:52
  • 276 - 2348 Helium configuration variables.mp4
    13:25
  • 277 - 2352 Helium with a simple web service.mp4
    13:41
  • 278 - 2400 ArduinoRaspberry Pi wireless communication with the RF24.mp4
    15:23
  • 279 - 2410 A home notification board with a large display.mp4
    08:01
  • 279 - HomeAlertSinatraWlathrough.pdf
  • 279 - HomeAlertwalkthough.pdf
  • 280 - 2420 Using a magnetometer to detect motion.mp4
    07:14
  • 281 - Bonus Lecture.html
  • Description


    Create Arduino gadgets that can communicate, move, interact, measure and detect.

    What You'll Learn?


    • Use communications technologies like Wifi, BLE, and radio
    • Use servo, DC and stepper motors with various controllers
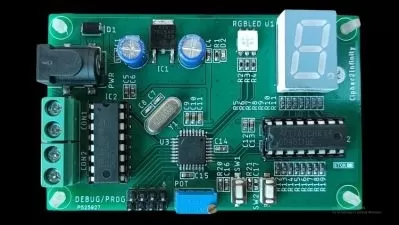
    • Use LCD, OLED and TFT screens with buttons and touch interfacese
    • Store data in external storage like SD Cards and EEPROM
    • Optimise a sketch to minimise memory footprint, reduce power consumption and increase performance
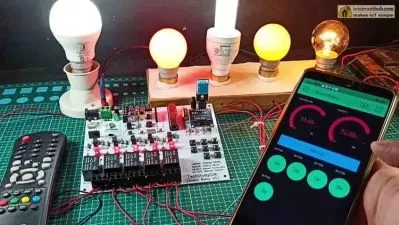
    • Control large loads like relays and lights
    • Improve button reliability with hardware debouncing
    • Much more, please see curriculum for a full listing

    Who is this for?


  • Arduino makers that wish to improve their skills and knowledge
  • Teachers who want Arduino resources for their classroom
  • Maker space coordinators who are need an online resource for their members
  • What You Need to Know?


  • You have a basic understanding of the Arduino
  • A copy of the Arduino IDE
  • You can write simple sketches
  • You can create small circuits on a breadboard
  • Basic tools, like a multimeter, a breadboard, wires, an Arduino Uno board, etc (a list of required tools and parts is available in the first section of the course, free to access)
  • More details


    Description

    Welcome to Tech Explorations Arduino Step by Step Getting Serious, where you will extend your knowledge of Arduino components and techniques and build up new skills in the largest, and the most comprehensive course on the Web!

    Arduino is the world's favorite electronics learning and prototyping platform. Millions of people from around the world use it to learn electronics, engineering, programming, and create amazing things, from greenhouse controllers to tree climbing robots remotely controlled lawnmowers. 

    It is a gateway to a career in engineering, a tool for Science, Technology, Engineering, and Mathematics education, a vehicle for artistic and creative expression.

    The course is split into 40 sections and over 250 lectures spanning more than 30 hours of video content. 

    In each section, you will learn a specific topic. 

    Each topic contains:

    • multiple examples of code
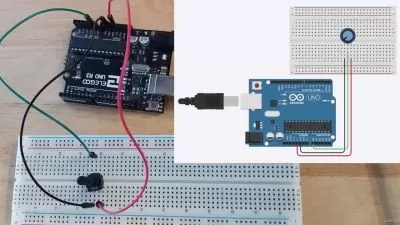
    • wiring schematics

    • demonstrations of a completed circuit

    • alternative scenarios

    Peter, the instructor, and designer of this course, helps you understand the code and the circuit wiring by walking you through them, step by step and explaining every line of code and every wire of the circuit. 


    Students have access to:

    • The course repository, which contains all of the sketch code, wiring schematics and external resource links, which Peter keep up-to-date and correct

    • The course discussion Forum, where you can ask questions. Peter monitors this Forum regularly and responds to your questions

    • The Tech Explorations Makers Club private Facebook group where students can discuss their gadget ideas. Use this group to ask questions that don't fit within the context of the course, discuss your projects or help others


    This course contains:

    • 24 hours of brand new video content 

    • 12 hours of retouched video content (which I will be replacing in regular intervals with brand new content)

    • 42 sections with totally reorganised content

    • More than 280 lectures (and counting)

    • Over 100 new and updated sketches (and counting)

    • Over 50 new circuit schematics (and counting)

    • New course repository, reorganised so that sketches, schematics and lecture external resources are easy to find (access everything at one place)


    Here are some of the topics that you will learn about in this course (for a full list, please look at the course curriculum):

    • Advanced environment, motion, position and GPS sensors. 

    • New ways to receive input from the user with keypads, potentiometers, and encoders.  

    • New ways to provide feedback to the user, with color screens, complete with a touch-sensitive surface!

    • Awesome ways to configure LEDs, monochrome or color. 

    • Use matrix or LED strips, display text, graphics, and animation.

    • Create motion with various kinds of motors and controllers.

    • Networking with Ethernet and Wifi. Communications with Bluetooth, Bluetooth Low Energy, 

    • Communications with highly-reliable packet-based radio, and simple, ultra low-cost radio for less critical applications

    • Multiplying your Arduino's ability to control external devices with shift registers and port expanders.

    • Much, much more (for a full list, please look at the course curriculum)


    This course is not appropriate for people new to the Arduino. It will not teach you about the basics of the Arduino, like how to use the Arduino IDE, blink an LED or create a simple sketch and circuit. If you are a new Arduino maker, you should consider taking the Tech Explorations Arduino Step by Step Getting Started course first.

    Apart from a basic understanding of the Arduino, a student of this course must be willing to work hard. You can't learn serious skills without serious work. There are a lot of courses out there that promise you a fun and easy learning experience. This is not one of them. I promise you a lot of hard work ahead.

    What about tools and parts? 

    Other than a few essential tools and parts that you can learn about in the first section of the course (which is free to watch) I only ask that you come with an appetite to learn and a willingness to work hard. The course features a large variety of parts, but you don't need (and you shouldn't) get them all to begin learning. In fact, getting all of these parts too early is not a good idea! Watch the free lecture to understand why in the first section of this course.

    Should you join right now?

    Watch the free lectures in the first section of this course before you choose to join. They contain valuable information that will help you decide if this is the right course for you. 

    I look forward to learning with you!

    Who this course is for:

    • Arduino makers that wish to improve their skills and knowledge
    • Teachers who want Arduino resources for their classroom
    • Maker space coordinators who are need an online resource for their members

    User Reviews
    Rating
    0
    0
    0
    0
    0
    average 0
    Total votes0
    Focused display
    Category
    Dr. Peter Dalmaris
    Dr. Peter Dalmaris
    Instructor's Courses
    Peter Dalmaris is an educator, electrical engineer, electronics hobbyist, and Maker. Creator of online video courses on DIY electronics and author of three technical books, and has recently released his book Maker Education Revolution.  As a Chief Tech Explorer since 2013 at Tech Explorations, the company he founded in Sydney, Australia, Peter’s mission is to explore technology and help educate the world. Tech Explorations offers educational courses and Bootcamps for electronics hobbyists, STEM students and STEM teachers.A life-long learner, Peter’s core skill is in explaining difficult concepts through video and text. With over 15 years of tertiary teaching experience, Peter has developed a simple yet comprehensive style in teaching that students from all around the world appreciate. His passion for technology and in particular for the world of DIY open source hardware has been a dominant driver that has guided his personal development and his work through Tech Explorations.Peter’s current online courses have helped over 60,000 people from around the world to be better Makers. For more information on Peter's work, please go to his web site, techexplorations dot com.
    Students take courses primarily to improve job-related skills.Some courses generate credit toward technical certification. Udemy has made a special effort to attract corporate trainers seeking to create coursework for employees of their company.
    • language english
    • Training sessions 280
    • duration 33:51:46
    • English subtitles has
    • Release Date 2024/03/21