Adobe Lightroom Classic The Complete Photo Editing Course From Import to Export
Frank Minghella
6:08:22
Description
Hi everyone and welcome to the Ultimate Lightroom Classic Course
This course will teach you everything you need to know about using Adobe Lightroom Classic. It will show you how to bring your photographs to life in fabulous easy to follow modules allowing you to jump in and learn at your own pace. Everything is covered from setting up a catalog through to final export and of course how to edit like a professional. Created by a professional photographer and media teacher each module will simply explain each process allowing you to release your inner creativity and create beautiful photographs.

I have listed the course modules below together with a snippet of what to expect in each. I hope you are excited to begin your Lightroom journey and you enjoy the course as much as I did in creating it. Please take part in the practical demonstrations and post your photographs too - I would love to see your work.
Best wishes, Frank
-
Module 1: Understanding the Lightroom Catalog System
Let’s begin with an easy to follow explanation of the Lightroom Catalog System. Using simple graphics you will learn the importance of adopting an organised workflow using storage folders connected to the Lightroom Catalog. I promise the catalog system will begin to make so much sense after watching this module preparing you for the first step - creating a Catalog and importing photographs.
-
Module 2: How to Create a Catalog
Your journey begins with learning how to set up a catalog the correct way to avoid problems in the future. It is a simple process that and in this module you will learn how to create, name and store your catalog safely. Creating a Catalog is an exciting first step on your creative journey.
-
Module 3: Importing Photographs From Your Computer
In this module I will show you the correct method of importing photographs that are perhaps stored in your Documents or Pictures Folder. During this import to Catalog stage you will learn how to adapt a sensible workflow and the importance of moving your photographs to a main photographic folder stored on an external drive.
-
Module 4: Importing Photographs From an SD Card
The process of how to import photographs from your memory card is demonstrated in this module, showing you the simple steps you need to take and the options you have available. During the import I will show you how to create a new folder within the Catalog to safely store your photographs.
-
Module 5: How to Maximise Screen Space
Lightroom has a lot of panels, windows, menu items etc. and it makes sense to only have them visible when you need them. The more screen space you make available for photographs the easier it becomes to navigate and make edits. In this module I will show you how to make Lightroom a beautiful uncluttered working environment.
-
Module 6: Understanding the Library Module
During this tour of the Library Module I will show you how the library functions and the many various options you have. It may look daunting when you first use Lightroom but don’t worry you will soon be navigating around the Library without a second thought. Each panel and option is simply explained and will make you confident of moving forward with your new found knowledge.
-
Module 7: How to Add Keywords
Locating specific photographs in Lightroom is easy if you have added keywords to your photos. In this module I will show you several methods of how to add keywords and how to use the keywords to find specific photographs. It is a very simple process but well worth doing as it will help you in the long run.
-
Module 8: How to Rate Your Photographs
During an import you will quite often import photographs that are very similar to each other. This is typical for most photographers as we take multiple shots at the same location. After import it is good practise to ‘rate’ your photographs. This process allows you filter out (but not delete) the images you don’t want visible in your filmstrip. It makes Lightroom a lot more streamlined and uncluttered too.
-
Module 9: How to Create a Collection
Imported photographs live in individual named folders. Simply click on a folder to open it and select a photo. But what do we do if we want to see photographs from various folders all living together? Well we simply create a collection. In this module I will show you how to create and use collections to bring photographs together from individual folders.
-
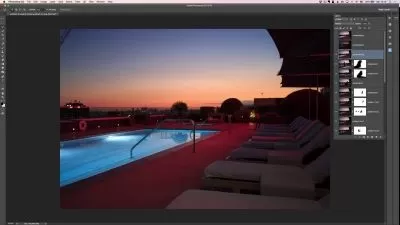
Module 10: Understanding the Develop Module
During this tour of the Develop Module I will show you how the Develop Module functions and the many various options you have. It may look daunting when you first use Lightroom but don’t worry you will soon be using all the editing tools to make wonderful edit. In this module I will introduce you to all the editing tools and describe exactly what each does.
-
Module 11: Correcting White Balance
Our eyes are amazing at determining colours and colour shifts in changing light. Cameras are pretty good but too, just not as good. In this module we will take a look at white balance and how to correct colours using the White Balance Tool. My top tip is to always shoot in the RAW format, that way you can retrospectively change the WB in Lightroom. Unfortunately this feature is not available to you if have shot your photographs in the JPEG format.
-
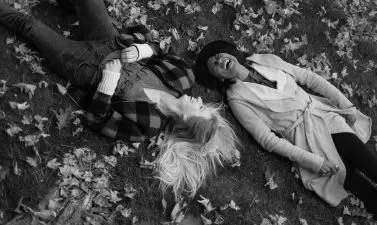
Module 12: A Complete Edit From Start to Finish
How Exciting! In this module I will take you through a complete edit from start to finish. Along the way you can watch me use the various editing tools to achieve the finished result. Each edit is simply demonstrated and explained to give you a full understanding of the editing process. (You may download the photograph used in the module and try all the techniques shown in the tutorial)
-
Module 13: Creating Local Edits With The Adjustment Brush
Quite often when editing we apply edits globally to the whole image. But what do we do when we wish to apply and edit to a specific part of the photograph? Well we use the Adjustment Brush. In this module I will show you how to create ‘masks’ with the Adjustment Brush allowing you to target exactly where you would like to make the changes. (You may download the photograph used in the module and try all the techniques shown in the tutorial)
-
Module 14: Using the Tone Curve
In this module I will use the Tone Curve Tool to create a unique vintage look. Tone curves can be used to adjust colours and contrast targeting the overall luminosity and individual colour values of Red Green and Blue. Simply manipulate each curve or alternatively use the individual sliders.
-
Module 15: Copy and Pasting Edits
Save time during the editing process by simply copying the edits from one completed edited photo and paste them onto a photograph captured at the same location or event. In this module I will show you several methods of how to use this fabulous time saving function.
-
Module 16: Relight Your photographs With The Radial Filter
Light is an extremely powerful element and our eyes are drawn to it. Using the Radial Filter we can add and shape light to a specific part of a photograph. Doing this gives emphasis to the subject matter and directs the viewer to the area in question. It is a great technique to learn and in this module you can watch me adding light to the subjects face on a dark street in Madrid. (You may download the photograph used in the module and try all the techniques shown in the tutorial)
-
Module 17: How to Remove Unwanted Digital Noise
Nobody likes a noisy photograph. Noise is caused by using a particularly high ISO value or by lifting the exposure of an underexposed photograph in Lightroom. I will show you how using the Detail Tool we can simply lessen the amount of noise if not completely remove it altogether. It really can help ‘save’ a photograph that you may have considered underexposed. (You may download the photograph used in the module and try all the techniques shown in the tutorial)
-
Module 18: Bring the Sky to Life With The Dehaze Tool
I do love a highly detailed sky with marvellous cloud formation. I also like nothing better than adding drama with the Dehaze Tool and the adjustment brush. In this module I will simply ‘paint in’ the detail by adjusting the amount ‘Dehaze’ You will be amazed at how simple it is to bring the sky to life. (You may download the photograph used in the module and try all the techniques shown in the tutorial)
-
Module 19: Remove Unwanted Details With The Spot Removal Tool
The Spot Removal Tool has two functions and in this module we will take a look at both. First I will show you how to remove unwanted areas of a photograph using the ‘heal’ option. Then we will take a look at the ‘clone’ option and I will show you how you can ‘rebuild’ areas by replacing pixels.
-
Module 20: Jumping Between Lightroom and Photoshop
Jumping from Lightroom to Photoshop is simple, however you may never need to visit Photoshop as Lightroom offers most of the editing tools to create fabulous photographs. That said most photographers do occasionally jump into Photoshop to create an edit that is not possible in Lightroom. In this module I will demonstrate this by adding a reflection of the Liverpool waterfront in the river below. (You may download the photograph used in the module and try all the techniques shown in the tutorial)
-
Module 21: How to Change the Colour of Anything
Back to the Adjustment Brush once again and in this module I will create masks to help completely change the colour of anything. It really is a simple process of creating a mask, removing the colour information and then adding the desired colour.
-
Module 22: How to Export for Web or Print
Finally once you are happy with your edited photographs you will need to export them from Lightroom. The export process is straightforward - you just need to decide where the photographs will end up ie: web or print. During the export process you will create new JPEG versions of your photographs. These new JPEGS can be resized based on where they will be viewed either online of for print.
What You'll Learn?
- Photography
- Creative
- Photo Editing
- Post Production
- Adobe Lightroom
- Raw Processing
- Photo Storage
More details
User Reviews
Rating

Frank Minghella
Instructor's Courses
Hello, I'm Frank, Photographer, media lecturer and obsessive creative. (and part time rock star... : )
Photography is my biggest passion and teaching photography allows me to share my knowledge and enthusiasm with others, which I love to do. Over the years I have taught photography I like to think I have created a whole new generation of creative photographers.
My mission is to unleash your inner creativity by giving you the skills to become confident with your camera. Once you have been shown how to get the best from your camera you will become capable of capturing exciting images and the Auto setting will become a distant memory.
I make learning how to use your camera fun with easy to follow animated explanations and practical demonstrations. I would like you to take part in the practical sessions. Simply follow along and apply the same camera settings used in the relevant module. Then post your results for me to take a look at.
Ready to unleash your inner creativity?

SkillShare
View courses SkillShare- language english
- Training sessions 23
- duration 6:08:22
- English subtitles has
- Release Date 2023/12/31