3D Cars: Inside and Out in Blender
CG Masters,Chris Plush
45:01:25
Description
The most comprehensive step-by-step guide to 3D car modeling, shading, and rendering in Blender.
What You'll Learn?
- Learn a powerful mesh modeling workflow that can achieve Class A quality surfaces without using nurbs.
- Master advanced hard surface modeling techniques for perfect topology, perfect curvatures, and perfect reflections.
- Create complex and fully customizable shaders for your final renders, including fully procedural car paint and carbon fiber, and a lot more.
- You'll even learn about rigging as we rig the wheels to spin and turn, and we'll rig the doors to open and close so we can pose them all for the final renders.
- Learn how to get the perfect final renders to really show off the car, including animating for motion blur, compositing, and post processing all inside Blender.
- Includes a "Full Guide to the Guide Mesh" in video and as a PDF. This is a complete and up-to-date guide on the most useful hard surface techniques out there.
Who is this for?
What You Need to Know?
More details
DescriptionHere we go again, but this time the course is bigger, better, and there’s a whole lot of new stuff, including a full interior. My past car modeling training has been studied by designers from industry giants like Hyundai, Volvo, Kia, and Ford, as well as from top gaming and film companies all over the world. And now I’ve taken those techniques and made them even better.
In this step-by-step course we’ll tackle an amazing car design by professional designer Lee Rosario, and I’ll show you new ways to solve even the trickiest hard surface challenges with ease as we build this awesome car together from the first vertex to the final renders. So join me in this car creation journey, and learn tons of techniques for hard surface modeling, shading, rendering, and compositing, all inside the free open source 3D software, Blender.
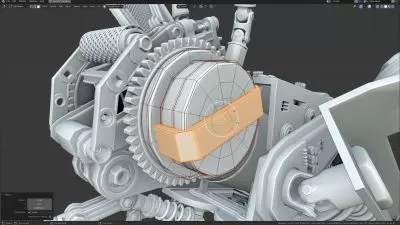
The Guide Mesh Technique - Updated!
Subsurface modeling is an essential mesh modeling workflow for hard surface artists, but it can quickly become a headache when adding details or cutouts to your model. Any modifications can easily ruin a curved surface, making the entire process frustrating and time-consuming.
In this course, I’ll show you a completely non-destructive technique I developed that avoids these problems entirely, so you can maintain perfect curves without any hassle and achieve a quality comparable to class A surfaces without using nurbs. This workflow has also been significantly upgraded since my last course, making it easier and better than ever, and bringing us to the final evolution of what I call the Guide Mesh Technique.
A Workflow Like No Other
The Guide Mesh technique allows you to focus entirely on perfecting the curvatures of your model using a separate mesh, without worrying about all the details complicating the topology. This will speed up your workflow and guarantee perfect reflections on your final panels, even after adding in all the cutouts and separations between them.
This workflow also gives you total control over achieving perfect topology in the end, but also offers a great deal of freedom where even bad topology will end up looking flawless. And there are tricks you can pull off with this that you just simply can’t do any other way.
Advanced Modeling Techniques
You’ll learn about countless other modeling techniques and tools in this course as well, like how insanely powerful Blender’s modifiers can be for complex modeling tasks. Modifiers are essential to an efficient and non-destructive workflow, and I’ll show you a ton of different and unique ways to use them and combine them.
And with so many different parts of a car to model, we’ll need to approach different challenges using different modeling techniques, so you’ll gain a thorough understanding of the thought process and how using the right tools the right way can save you a lot of time and effort.
Core Modeling Principles
Not only will you learn about advanced techniques that take the quality of your models to the next level, but we’ll also dive deep into learning the core principles behind subsurface modeling and polygon modeling in general. Good modeling begins with a comprehensive understanding of the fundamentals like topology, efficiency, and what tools are best for the job.
On top of that, you’ll learn about the thought process behind each step of the modeling process. Visualizing how the model should look in the end and being able to simplify complex modeling challenges each step of the way are all critical to an effective workflow.
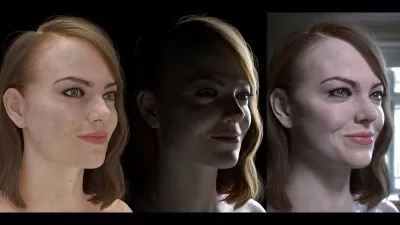
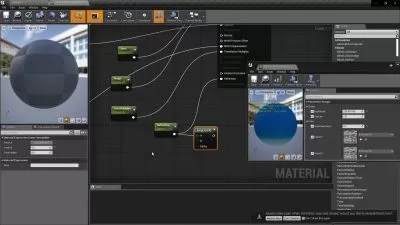
Fully Customizable Shaders
After all the hard work that goes into the model, the next step is setting it up for renders you can be proud of. Getting the final render looking just right can bring out the best in your model and truly reflect your skills as a 3D artist, and this begins with the perfect shaders. Using Blender’s powerful Shader Editor, we’ll create fully customizable shaders including realistic car paint with metallic flakes, a fully procedural carbon fiber, fabric, leather, and more.
Just like the modeling process, these complex shaders will be built step-by-step and you’ll learn the reasoning and logic behind every move, helping you gain a strong proficiency in shader development so you can apply these newfound skills to all of your own projects as well.
Rigging and Animation
Once the model is complete, we’ll set it up with a basic rig to pose it for rendering. We’ll rig the wheels so they can spin and turn, and we’ll even rig the doors so they can open and close, giving us more options to customize the final look. We’ll also animate the tires and the environment to set up motion blur for the final renders, really bringing the model to life. You’ll learn about parenting, constraints, keyframes, using the Graph Editor, and how to set up motion blur to get the perfect action shot.
The Final Renders
Finally we’ll dive into all the elements that make a great render you can show off, including setting up lighting and an environment, getting the perfect camera angle, using Blender’s compositing nodes to make the final shot really pop, and even using Blender’s paint tools to add the final post processing to complete your renders. And with plenty of room for customization, and several environments and lighting setups included in the training, you’ll be able to make the results your own.
Plus Extras!
I’ve also included extra stand-alone chapters on the Guide Mesh technique, teaching you everything you need to know about this extremely useful workflow, without having to dig through the course for it. These “Full Guide to the Guide Mesh†chapters will go over the theory behind the technique, all the rules for using it, plus a chapter full of tips and unique tricks for it. All of this information is also outlined in a PDF for you, so you have a quick reference to all of this for your own projects.
All necessary project files are included in the course too, such as blueprints, reference images, and textures, and it also includes the final car model. And it’s a big course, so it also made sense to include some Easter Eggs as a fun break along the journey!
Need a Commercial License?
This course and its contents are for personal use. If you’re interested in using this commercially or for training your company, contact me for commercial license details.
Subtitles in 12 Languages
This course is in English and includes English subtitles. The course also includes automatic translations for 11 other languages, including French, German, Italian, Japanese, Korean, Polish, Portuguese, Russian, Spanish, Traditional Chinese, and Simplified Chinese.
Keep in Touch!
If you get stuck and need help at any point in the project, or even if you just want to share your progress, you can keep in touch with me in the Q&A section.
Who this course is for:
- Anyone interested in 3D modeling, shading, and rendering in Blender.
Here we go again, but this time the course is bigger, better, and there’s a whole lot of new stuff, including a full interior. My past car modeling training has been studied by designers from industry giants like Hyundai, Volvo, Kia, and Ford, as well as from top gaming and film companies all over the world. And now I’ve taken those techniques and made them even better.
In this step-by-step course we’ll tackle an amazing car design by professional designer Lee Rosario, and I’ll show you new ways to solve even the trickiest hard surface challenges with ease as we build this awesome car together from the first vertex to the final renders. So join me in this car creation journey, and learn tons of techniques for hard surface modeling, shading, rendering, and compositing, all inside the free open source 3D software, Blender.
The Guide Mesh Technique - Updated!
Subsurface modeling is an essential mesh modeling workflow for hard surface artists, but it can quickly become a headache when adding details or cutouts to your model. Any modifications can easily ruin a curved surface, making the entire process frustrating and time-consuming.
In this course, I’ll show you a completely non-destructive technique I developed that avoids these problems entirely, so you can maintain perfect curves without any hassle and achieve a quality comparable to class A surfaces without using nurbs. This workflow has also been significantly upgraded since my last course, making it easier and better than ever, and bringing us to the final evolution of what I call the Guide Mesh Technique.
A Workflow Like No Other
The Guide Mesh technique allows you to focus entirely on perfecting the curvatures of your model using a separate mesh, without worrying about all the details complicating the topology. This will speed up your workflow and guarantee perfect reflections on your final panels, even after adding in all the cutouts and separations between them.
This workflow also gives you total control over achieving perfect topology in the end, but also offers a great deal of freedom where even bad topology will end up looking flawless. And there are tricks you can pull off with this that you just simply can’t do any other way.
Advanced Modeling Techniques
You’ll learn about countless other modeling techniques and tools in this course as well, like how insanely powerful Blender’s modifiers can be for complex modeling tasks. Modifiers are essential to an efficient and non-destructive workflow, and I’ll show you a ton of different and unique ways to use them and combine them.
And with so many different parts of a car to model, we’ll need to approach different challenges using different modeling techniques, so you’ll gain a thorough understanding of the thought process and how using the right tools the right way can save you a lot of time and effort.
Core Modeling Principles
Not only will you learn about advanced techniques that take the quality of your models to the next level, but we’ll also dive deep into learning the core principles behind subsurface modeling and polygon modeling in general. Good modeling begins with a comprehensive understanding of the fundamentals like topology, efficiency, and what tools are best for the job.
On top of that, you’ll learn about the thought process behind each step of the modeling process. Visualizing how the model should look in the end and being able to simplify complex modeling challenges each step of the way are all critical to an effective workflow.
Fully Customizable Shaders
After all the hard work that goes into the model, the next step is setting it up for renders you can be proud of. Getting the final render looking just right can bring out the best in your model and truly reflect your skills as a 3D artist, and this begins with the perfect shaders. Using Blender’s powerful Shader Editor, we’ll create fully customizable shaders including realistic car paint with metallic flakes, a fully procedural carbon fiber, fabric, leather, and more.
Just like the modeling process, these complex shaders will be built step-by-step and you’ll learn the reasoning and logic behind every move, helping you gain a strong proficiency in shader development so you can apply these newfound skills to all of your own projects as well.
Rigging and Animation
Once the model is complete, we’ll set it up with a basic rig to pose it for rendering. We’ll rig the wheels so they can spin and turn, and we’ll even rig the doors so they can open and close, giving us more options to customize the final look. We’ll also animate the tires and the environment to set up motion blur for the final renders, really bringing the model to life. You’ll learn about parenting, constraints, keyframes, using the Graph Editor, and how to set up motion blur to get the perfect action shot.
The Final Renders
Finally we’ll dive into all the elements that make a great render you can show off, including setting up lighting and an environment, getting the perfect camera angle, using Blender’s compositing nodes to make the final shot really pop, and even using Blender’s paint tools to add the final post processing to complete your renders. And with plenty of room for customization, and several environments and lighting setups included in the training, you’ll be able to make the results your own.
Plus Extras!
I’ve also included extra stand-alone chapters on the Guide Mesh technique, teaching you everything you need to know about this extremely useful workflow, without having to dig through the course for it. These “Full Guide to the Guide Mesh†chapters will go over the theory behind the technique, all the rules for using it, plus a chapter full of tips and unique tricks for it. All of this information is also outlined in a PDF for you, so you have a quick reference to all of this for your own projects.
All necessary project files are included in the course too, such as blueprints, reference images, and textures, and it also includes the final car model. And it’s a big course, so it also made sense to include some Easter Eggs as a fun break along the journey!
Need a Commercial License?
This course and its contents are for personal use. If you’re interested in using this commercially or for training your company, contact me for commercial license details.
Subtitles in 12 Languages
This course is in English and includes English subtitles. The course also includes automatic translations for 11 other languages, including French, German, Italian, Japanese, Korean, Polish, Portuguese, Russian, Spanish, Traditional Chinese, and Simplified Chinese.
Keep in Touch!
If you get stuck and need help at any point in the project, or even if you just want to share your progress, you can keep in touch with me in the Q&A section.
Who this course is for:
- Anyone interested in 3D modeling, shading, and rendering in Blender.
User Reviews
Rating

CG Masters
Instructor's Courses
Chris Plush
Instructor's Courses
Udemy
View courses Udemy- language english
- Training sessions 252
- duration 45:01:25
- Release Date 2024/04/23